Adding options to WordPress plugins
Posted by Leonid Mamchenkov on August 15, 2007
Most WordPress plugins out there are simple things, fixing or changing one thing at a time. But there are also examples of more complex things, like e-commerce and banner management, advanced anti-SPAM control, more flexible content and user management, etc. One of the common things between those “advanced” plugins is that they almost always provide a user with a way to configure them – a screen with options.
In this post, we’ll see how to create plugins which integrate into WordPress options administration.
Let’s start with something simple first and work our way through. Here is a rather simplistic first version of the “Hello World” plugin that we’ll be expanding and and improving.

This plugin, when activated, provides a function say_hello() which will print ‘Hello world’ from where it is called. For the sake of the example, I use it for my sidebar. In the sidebar.php of my current theme I put these lines:
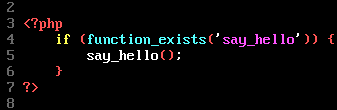
Here, I’m checking for the existence of my say_hello() function. If my plugin is deactivated, nothing will be printed out. If it is activated, and the function available, it will be called, and the output of it will appear in my sidebar. If I won’t check for the existence of the function, than chances are, I’ll get a nasty error message in my sidebar when the plugin is disabled. Obviously, I don’t want that.
OK. Now we have everything setup for our journey into Plugin Options Land. Let’s first modify the plugin to work with hardcoded options. We’ll add the interface later. Here is the second version of the plugin:

So, what happens here? First of all, I modified my say_hello() function to use two WordPress options – ‘hello_greeting‘, which I can use to change the greeting text to ‘hi’, ‘good morning’, or whatever I feel like, and ‘hello_target‘, which I can use to change ‘world’ to ‘me’, ‘admin’, universe’, or, again, whatever I feel like.
Then, I added a couple of functions – set_hello_options() and unset_hello_options() . I use this to, obviously, add and remove my options to WordPress options table.
And the last thing I added here is plugin activation and deactivation hooks. When my plugin is activated, options are added to WordPress database. When the plugin is deactivated, a cleanup is called and options are removed from the database. We saw how to do this before, in the automation with plugin post.
Under the hood changes don’t affect the result – I can still see the “Hello world” in my sidebar after plugin deactivation-activation, which is needed to set up options right.
So far so good. Now for the juicy stuff. How can we manage those plugin options of ours from within administration screens? The answer is simple. We’ll have to add a new screen to the Options area of the administration. We’ll need a sub-menu item (similar to ‘General’, ‘Writing’, and ‘Reading’ which are already there) under Options. That sub-menu item will point to our own options form, which will have our own logic and way of doing things.
How do we add a menu or sub-menu item to WordPress administration interface? Let’s see what Codex has to say about it. A quick search here and there and … yup … we have it! Adding Administration Menus page tells us all we need to know and more. It covers all the grounds – main menu items, sub-items, has a sample plugin, and this and that. Now I don’t even know why I’m writing this article anymore – that’s how good that page is… But people always tell me that I never finish anything, so just to prove them wrong, I’m going to finish this post anyway.
For the needs of our plugin, we need only one line out of that page. The one which shows the example of add_options_page() function call. Let’s see how it applies to our code in the third version of the plugin. (Note, that the code listing is getting long, so I’ll just skip the first part of the file – use line numbers for reference, if you need any. But you can simply append this code chunk to the one in the second version):
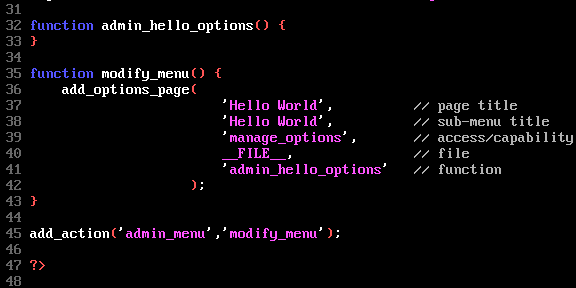
This might look a little confusing, but don’t let the looks of it set you off. Here is what happens. To modify WordPress administration menu, we have to hook to ‘admin_menu‘ action. Our plugin tells WordPress to call a function modify_menu() when the action ‘admin_menu‘ is executed. (You might want to pick a more unique name for a real life plugin, by the way) Our modify_menu() function can do all sorts of changes to the administration menu, but we need it to do only one – add a sub-menu to Options page.
To add a sub-menu to Options page we are using the add_options_page() function. I separated parameters to one per line with a little comment to make it easier to read. First parameter is used for the page title. Nothing important, so you can put anything in here. The second parameter specifies how we want our sub-menu item to be named. This is what will appear in the menu. The third parameter specifies which user level access or capability a user must have to be able to access this menu item. WordPress will hide the menu automatically from users who don’t have rights to access it. Now, the fourth and fifth parameters specify the file and function to call when the menu item is selected by the user.
These last two parameters give a lot of flexibility to how you want your plugin code organized. If you build something small and simple, like we are doing now, you probably would want to handle everything from a single file. Use __FILE__ as the name of the file for current file, and have a function that would handle all the administration stuff. If you have something more complex, you might want to have this Options screen stuff separated into a file of its own. Then you don’t have to specify the function – have all your logic in the file and that’s it. If you have something even more complex, you might want to use both the file and the function within it, to specify a precise place of where the options handling is happening. WordPress doesn’t limit you here in any way – it gives you the right to choose what’s the best approach for your task. This is one of those places that make WordPress so easy to appreciate.
Back to our example. From the code above you can see that I created an empty function admin_hello_options() which will be called when the user selects Options->Hello world menu item. Because my function is empty at the moment, not much fun will happen. Let’s see a screenshot, should we.

It’s all here – Options menu, Hello World sub-menu, an empty thing done by my empty function, and a standard WordPress footer. We are moving along just fine.
Now for the final step of our journey. We need to integrate our plugin, which supports options just fine, with the nice WordPress interface which we managed to find our way in. Again, I’ll try to keep things as simple and small as possible here.
First, let’s put some logic into our admin_hello_options() function. Here is one way to have it:
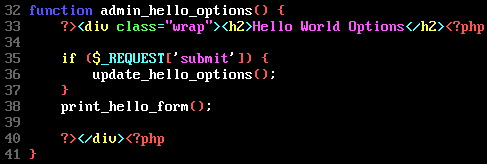
WordPress uses Cascading Style Sheets (CSS) to control how things look. So, to make our options blend in nicely, all we need to do is to use the same CSS classes as WordPress does in other Options screens. That’s why we wrap everything into a DIV with class “wrap“. And that’s why we use the H2 for the heading.
The logic of our options handling is pretty simple. If value were updated through the form, then save them in the database. Print the form to change the options in any case – whether they were just changed or not. That sounds like two functions and an IF statement. And that’s what we have in our function – a check for the submit button click, and two calls – one to update_hello_options() function, and another one to print_hello_form() function. Of course, you can skip all these functions and just through pieces together. But that’s not how I prefer it.
Now that we separated things, let’s look at them one at a time. update_hello_options() function may look something like this:
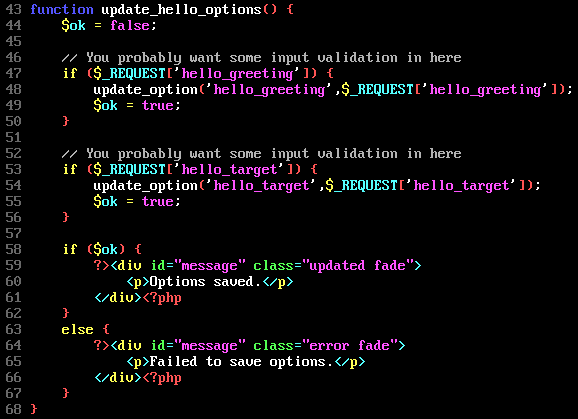
Check if each of the options was passed from the form, and if it was, save the new value to the database. If at least one option was updated, then print the OK message. If no options were updated, then something went really wrong (how could the form be submitted but not have any options defined in it?) and we should print the error message. Again, the classes are used the same way as I saw them on the other Options pages. (those fading messages are cool, aren’t they?)
The form printing function is not any more complicated. It’s a regular HTML form with some default values used from the WordPress options. Here is how the code looks:
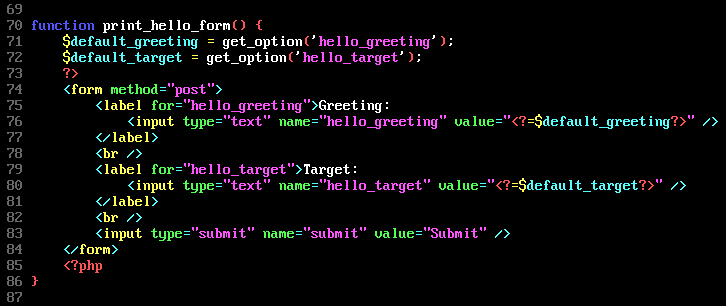
That’s about all we need to make it work. Here is a screenshot of Options->Hello world as I see it now:

It’s not the most beautiful thing that I’ve seen in my life, but it sure works. The default option values are there, and if I type in the new ones, and click “Submit” button, I get a nice message telling me that everything worked OK, and my web site’s sidebar shows the new values.
All that remains now is a little beautification of the screen. I’ll leave it as exercise to you, since you probably will change the looks of it anyway. Just a hint – surround the Submit button with the paragraph of the “submit” class, and use table of class “optiontable” for the lining up of your option rows. There is also something about fieldsets there too, but as I said – that stuff is too easy to find on your own. (View HTML source from within your browser).
In exactly the same way you can add screens to some other main menu items. Instead of add_options_page() call add_management_page() to add a screen under Manage, or add_theme_page() to the a screen under Presentation, or add_user_page() to add a screen under Users.

Fepe said
I was just looking for something like this, and then I saw it on my WP dashboard.
Thanks!
Leonid Mamchenkov said
Fepe,
glad that it caught your attention on time ;)
Arpit Jacob said
Good Read Now I know where to look if I ever what to start learning how to make a WordPress plugin.
Rene Kriest@ProBloggerWorld.de said
Where can I vote for this posting? I would like to give it 100/100 points. The content in combination with the screenshots simply rock. Without them this would be another average posting.
I was wondering whether there are websites that show coding veterans from the past (C64/Amiga/PC assembler ;)) how to do some basic WordPress Plugin coding. And here it is.
Thank you! :)
Leonid Mamchenkov said
Rene,
thanks. I’m glad you liked it. :)
By the way, there aren’t that many veterans around.. so I’m double glad. :)
Añadir opciones a plugins de Wordpress | Magarto said
[…] este tutorial/ejemplo en inglés nos explican de forma muy simple y gráfica, como añadir una pestaña de opciones para […]
Subbu said
Thanks for the article! Was looking for a simple guide like this.
I wanted to add a Options Page for my plugin, but was too lazy to go through WordPress Docs, this will considerably speed things up :)
Regards,
Subbu
alex said
Leonid, IMHO is worth to mention the importance of wp_nonce_field/wp_nonce_url/check_admin_referer functions when saving options that depend on user input — it seems that many developers are not aware about CSRF vulnerabilities.
Leonid Mamchenkov said
Subbu,
cool! If you have other topics that you want covered, feel free to suggest. :)
Leonid Mamchenkov said
Alex,
good point. Thanks for the reminder.
To be honest, I have to yet figure out those methods myself. I know of their existence, as I saw them used occasionally, but the general idea isn’t it consumed by my brain. :)
What I saw in somewhere, but forgot to mention is the capabilities check at the top of the options file. Something like:
if ( !current_user_can('manage_options') )

  wp_die(__('You do no have permission to access this page.'));
We’ll have to look into the subject of securing a WordPress installation, as well as considering security issues when creating themes, plugins, and widgets. However, I’m not a big expert in this area myself. Care to guest blog this? :)
Matthew Smith said
Awesome tutorial – I used this as inspiration to hack up a new plugin based off of BM Custom Login that I like to call Super Custom Login Page (sufficiently cheesy). Basically I’m using Binary Moon’s hook for the style sheet, the template, and the CSS, and adding a bunch of extra PHP of my own.
Between WPbits and the plugin reference on WordPress.org, I’ve managed to add a feature to allow you to customize the link and link title on the login page (so your site logo doesn’t link to wordpress.org). This was super simple and I managed to complete what’s done so far in a little over an hour. I plan to add the ability to customize the CSS from within WordPress’ admin area as well.
However, I’m also a little concerned about security – if I’m going to release this, I want to lock it down to prevent accidents.
Which brings me to my question: what functions should I use to “sanitize” my inputs? I’m sure there’s a “best practice” somewhere… I just haven’t found it yet.
Leonid Mamchenkov said
Matthew,
I am yet to write a security-related post. But, I’m sure, if you will release your plugin to the open source community, there will be quite a few people out there to point you to the right sources. :)
Top Posts « WordPress.com said
[…] Adding options to WordPress plugins Most WordPress plugins out there are simple things, fixing or changing one thing at a time. But there are also […] […]
Top English WP Blogs « KHỦNG LONG IT said
[…] Adding options to WordPress plugins Most WordPress plugins out there are simple things, fixing or changing one thing at a time. But there are also […] […]
Famous last words of Marius » RSS update - 17 August 2007 and birthdays said
[…] WordPress – Adding options to WordPress plugins […]
Adam Rice said
Nice. I’d love to see a post on how to add options to themes as well.
Kalessin said
I wasn’t going to bother with an Admin section of my plugin, but after
copyingreading your tutorial, it’s going to be pretty good.Many thanks for your hard work, and for finally finishing an article ;)
Ninjaboy said
Wow – I have learned soooo much from working through this tutorial, great work man and much appreciated!
However, I really want to learn more about how to secure this kind of plugin build. I have read through the comments and searched for info via Google and the WP site, but still havn’t worked out how to stop nasty people exploiting this kind of plugin – I simply don’t know enough about PHP and WP to do this.
Maybe you could post a simple solution that we can all understand – it would be VERY much appreciated (and yes, I’ve asked for help in the WP forums, but no-one is helping me (and many new plugin developers) out!
Otto said
If you do anything like this (taking input from the outside world in a plugin), take the time to figure out and implement nonces as well. It’s worth it.
Detailed info here:
List Draft Posts: a WordPress plugin : Losing it[1] said
[…] Support Forums when I saw someone asking for advice on developing plugins, which led me to this really nice article by Leonid Mamchenkov on how to make options pages for WordPress plugins, and this piece by Mark […]
De Todo Un Poco (III) | FePe55 said
[…] Quienes se encarguen de realizar plugins para WordPress, ya deben saberlo, pero para quienes no lo saben, en WPBits no explican de manera bien simple, como agregar un panel de opciones […]
Infovore » links for 2007-10-15 said
[…] Adding options to WordPress plugins « WordPress Bits Nice tutorial on creating options pages for your WordPress plugins. (tags: wordpress plugin development programming howto) […]
Ninjaboy said
Further the discussion on security implementations, I started a discussion thread over on the WordPress forum, which is starting to provide some valuable (and very relevant) info on securing a plugin with a build like in the example given.
The link is http://wordpress.org/support/topic/138450
pixelgeek said
Absolutely invaluable tutorial. I was able to create my first plugin in an hour or so.
Thanks very much
Keith said
Thanks for this excellent writeup! I am using your information in the development of a WordPress Plugin Framework in an attempt to create a common platform for developing WordPress plugins. I have provided a link below so that you may take a look at it and let me know what you think.
WordPress Plugin Framework v0.01
Feed Image Wordpress Plugin - Blog Archive - Ninedays Blog - web development, photography, tutorials and adventure said
[…] This is the first plugin I’ve written that has an options page, thanks to this article Adding options to WordPress plugins. […]
engel said
This is a great article! Thanks for informing us; I was quite lost with how to make an options page until I read this.
Ryan said
Thank you for the great tutorial. You laid out the basics in a nice easy way to understand.
Sunny said
very nice tutorial i like it very much nice work man keep doing these sort of trainings :)
macdet said
next time if i install wp, i come back and learn a bit :(
asvladimire said
thank you, it helped me a lot, you just cshould update functions..
Some dude said
Excellent step by step tutorial!
I was looking for something like this to build a plugin ASAP, but the codex docs I think, asume we know some stuff (not my case :P), so, quoting your text: “… Now I don’t even know why I’m writing this article anymore…”, I can only tell you that sometimes other points of view are needed!
The Ultimate Guide to Building a Wordpress Plugin - NETTUTS said
[…] administration menus. If you’re wanting a tutorial with screenshots, then try WordPress Bits’ Adding Options to WordPress […]
Cotton Rohrscheib - Blog Archive » Building a Wordpress Plugin said
[…] menus. If you’re wanting a tutorial with screenshots, then try WordPress Bits’ Adding Options to WordPress […]
» wordpress eklentisi oluşturma rehberi said
[…] görüntüleri ile zenginleştirilmiş bir rehber arıyorsanız, o zaman WordPress Bits’in WordPress’e Seçenekler Eklemek rehberi işinizi […]
wordpress eklentisi oluşturma rehberi | said
[…] görüntüleri ile zenginleştirilmiş bir rehber arıyorsanız, o zaman WordPress Bits’in WordPress’e Seçenekler Eklemek rehberi işinizi […]
WordPress Eklentisi Oluşturma Rehberi | Webmaster Arşivi | Script Download | Tema Download said
[…] görüntüleri ile zenginleştirilmiş bir rehber arıyorsanız, o zaman WordPress Bits’in WordPress’e Seçenekler Eklemek rehberi işinizi […]
dennyhalim.com said
any update on this? that works with wp 2.7?
tia
Harvey Ramer said
You saved me a great deal of time developing my plugin’s administrative interface. Thank you!
msnishanth said
You are good in explaining in simple way. Thank you, I will modify my plugin htmlPad with option supports.
msnishanth said
Thank you.
You are good in explaining in simple way. I will modify my plugin htmlPad with option supports.
Adding options to WordPress plugins « WordPress Bits « Dak's Blog said
[…] via Adding options to WordPress plugins « WordPress Bits. […]
Mehedi said
Thanks a lot … Based on this tutorial today i made my plugin option page for Admin Panel.
Thanks
Mehedi Hasan
Web Designer & Developer
Crear un Plugin WordPress | Todo Tutoriales web said
[…] Es probable, actualmente casi imprescindible, que tu plugin requiera un menú de opciones en su propia página del panel de administración de WordPress, para así configurar las posibilidades que ofrezca. De nuevo puedes recurrir al Codex para saber como añadir menús de administración. Si quieres un tutorial con capturas de pantalla también tienes este otro. […]
zacharyrs said
how can i save data into the db? i want to take field input and save it into a new table
Christian Guthermann said
Hello, thanks for a great tutorial, it has been very helpful, I am now making my first wordpress plugin, but have a small problem, in my plugin I want to let the “author” be able to change things, but if I login as an “author”, I can’t see my plugin in the admin area, is there any way to make only this plugin accessible to the people with author status? thanks again :D
Bofy said
Hi!
I want to write a simple plugin for my WordPress blog but I didn’t find any documentation for what I need.
I want to have a settings/options page to save each user’s website URL (by user ID) on a separate admin menu page, but not on Profile page.
I want to give each Logged In user the possibility to save and see the settings/options page with their individual options saved.
Can you post on your website an example, please?
Thanks!
Hello world!- Ayberk CAL | Free your mind ~ said
[…] wp’de diğer modifikasyonlarda işe yarayacak şeylerden bahsedilmiş. Merak ettiyseniz sizi buradan […]
Allan Tribe said
Thanks a ton. Using this for a plugin on my site. Tried someone else’s tutorial and it failed, this one was great. Thanks again.
EmpreJore said
I can’t believe that it’s May 2011 and your tutorial still work perfectly.
Thank you :D
Anwar Hossain said
Thanks..great info for wp plugins developer.
Yobif said
Thanks for your wonderful tutorial
Reparar y Arreglar » Informática – Tema: Crear un Plugin Wordpress said
[…] Es probable, actualmente casi imprescindible, que tu plugin requiera un menú de opciones en su propia página del panel de administración de WordPress, para así configurar las posibilidades que ofrezca. De nuevo puedes recurrir al Codex para saber como añadir menús de administración. Si quieres un tutorial con capturas de pantalla también tienes este otro. […]
Anhnm // Web designThe Ultimate Guide to Building a WordPress Plugin « said
[…] Your plugin might require an Options menu and page to show configurable choices for the WordPress administration section. The WordPress Codex has a great reference page on adding administration menus. If you’re wanting a tutorial with screenshots, then try WordPress Bits’ Adding Options to WordPress tutorial. […]
Osama Shabrez said
Its June 14, 2012 and still article save me day or might be two. A perfect example of what I was looking.
** wonders what WordPress might be in next 5 years **